

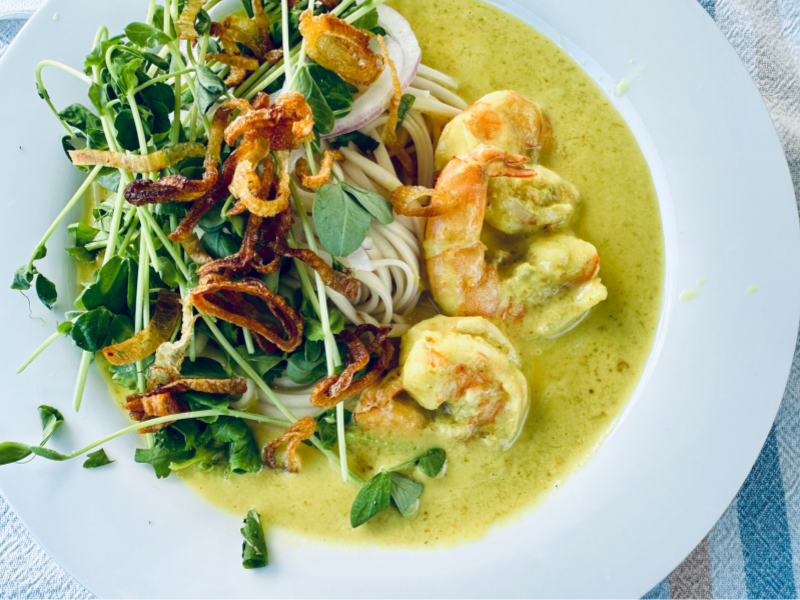
Khao Soi w/ Kauai Shrimp: A Light and Flavorful Summer Dish
Hello everyone! I’m excited to share with you a delightful twist on a traditional dish: Khao Soi with Kauai Shrimp. This version is perfect for summer—light, dairy-free, and packed with fresh flavors. Khao Soi is a rich, coconut-based curry noodle soup from Northern Thailand and Laos, traditionally made with chicken. Today, I’m giving it a Hawaiian twist with fresh Kauai shrimp.
Why Soup in the Summer?
I know—it sounds a little wild to be making soup in the middle of July when it’s hot outside! But sometimes soup is exactly what your body needs. My husband and son had a tiny summer cold, and this broth—with garlic, turmeric, and ginger—felt like just the thing to help. The coconut milk makes it mellow and kid-friendly, and my 6-year-old son loved it.
Also, you don’t have to serve it piping hot; it’s just as delicious warm.
About Khao Soi
Khao Soi, or Khao Soy, is a comforting soup with a creamy coconut curry base, often served with noodles and a variety of toppings. Traditionally, you’ll find it with chicken and crispy noodles, but it’s endlessly adaptable.
Why Kauai Shrimp
I do my best to use local ingredients for a few reasons. I enjoy supporting local food producers & their products generally taste better. It also feels good to support the 'little guy.' Kauai shrimp is definitely the best shrimp I’ve ever had. Check them out here: KauiShrimp. While it takes a little extra work to clean them, once you try them, you'll never go back. If you don't live in Hawaii, try to get the best quality local shrimp you can find, or go traditional with organic chicken.

Wait, Why do I want to clean MY shrimp?
Cleaning shrimp is an essential step to ensure a flavorful and enjoyable dish. Here’s why it’s important and how to do it:
Why Clean Shrimp
Remove Impurities: Cleaning shrimp removes any dirt, sand, and digestive tract (often referred to as the "vein"), which can contain sand or other impurities that affect the texture and taste of your dish.
Enhance Flavor: Properly cleaned shrimp have a better texture and taste, allowing the flavors of your recipe to shine.
Improve Presentation: Cleaned shrimp look more appealing, making your dish visually attractive.

How to Clean Shrimp
Rinse Shrimp:
Start by rinsing the shrimp thoroughly under cold running water to remove any surface dirt and debris.
Remove the Head:
Hold the shrimp firmly in one hand and twist off the head with the other hand. You can also use a knife. Discard the heads unless you plan to use them for making stock.
Peel the Shell:
Starting from the legs, peel away the shell from the body of the shrimp. You can leave the tail on for a more decorative presentation or remove it entirely.
Devein the Shrimp:
Use a small paring knife to make a shallow cut along the back of the shrimp. You will see a dark vein, which is the digestive tract. Gently lift it out with the tip of the knife and discard it.
Some people use a deveining tool, which can make this process quicker and easier.
Rinse Again:
Give the cleaned shrimp another quick rinse under cold water to remove any remaining bits of shell or vein.
Dry and Store:
Pat the shrimp dry with paper towels if you are not cooking them immediately. Store them in the refrigerator until you are ready for them. As a general rule, I prepare the shrimp the same day I will be using them.

How to Make Shrimp Stock
This step is totally optional, but it adds incredible depth — and it’s basically free! I can’t bring myself to pay for store-bought stock when it’s really just water plus scraps you already have. The shrimp shells are the star, but toss in whatever aromatics you’ve got: herbs, citrus, garlic, or onion. Twenty minutes of simmering, and you’ve saved yourself $10 while making a flavorful, sodium-free stock.
My favorite stock recipe: In a large pot, combine about 2 lbs shells, 1 chopped leek, 4 stalks celery, 1 lemon (halved), 4–6 garlic cloves, 2 bay leaves, a few sprigs of thyme, and peppercorns. Add enough water to cover and simmer gently for 20 minutes. Strain and use immediately, or cool and freeze for later.

Prepare Your Toppings
The right toppings can elevate your Khao Soi, adding texture, color, and layers of flavor. Here’s a breakdown of the toppings I chose for this dish and why each one is a great addition:
Pea Shoots:
Why: Pea shoots are a wonderful local produce option here in Hawaii, offering a fresh, slightly sweet flavor and a delicate crunch.
Alternatives: If you can’t find pea shoots, other microgreens or bean sprouts can be great substitutes, adding a similar lightness and texture to your dish.
Sliced Red Onion:
Why: Thinly sliced red onions provide a vibrant color and a satisfying crunch, complementing the rich, creamy broth of the Khao Soi.
How to Prepare: Use a mandoline or a sharp knife to slice the onion thinly, ensuring even slices for the best texture.
Lemon or Lime Wedges:
Why: A squeeze of fresh lemon or lime juice adds a bright, tangy note that cuts through the richness of the coconut milk, enhancing the overall depth of flavor.
How to Use: Serve wedges on the side, allowing each person to add as much or as little as they like.
Fried Shallots:
Why: Very much an optional step! But - fried shallots bring a delightful crunch and a slightly sweet, caramelized flavor that’s well worth the extra effort.
How to Prepare: Thinly slice shallots and fry them in cold oil over medium-low heat, stirring often, until golden brown. Drain on paper towels and season with salt immediately.
Cilantro:
Why: I absolutely love cilantro for its fresh, citrusy flavor and bright green color. It adds a lovely freshness to the dish.
How to Use: Roughly chop the cilantro and sprinkle it generously over the finished dish.
These toppings not only enhance the flavor and texture of your Khao Soi but also add visual appeal, making your meal as beautiful as it is delicious.

How to Fry Shallots
Crispy fried shallots are a fun topping that can enhance many dishes, from fried rice to salads, and even green bean casseroles. While you can buy fried shallots at many Asian supermarkets, making them at home is easy and rewarding. Here's how to get perfectly crispy, not burned, shallots every time.
Ingredients:
8 small shallots, peeled
Olive oil (for frying; about 1¼ cups)
Kosher salt

Instructions:
Prep the Shallots:
Thinly slice the shallots crosswise into rings using a mandoline slicer for even cuts. They should be about the thickness of a dime.
Fry the Shallots:
Place the sliced shallots in a medium saucepan and pour in enough olive oil to submerge them, about 1¼ cups.
Set the pan over medium-low heat and cook, stirring often with a fork to keep the rings separate. Starting the shallots in cold oil ensures that they caramelize evenly throughout. This process takes about 20-25 minutes.
Keep a close eye on the shallots; once they start to brown, they can go from golden to burnt quickly.
Drain and Season:
Once the shallots are golden brown, pour them into a fine mesh strainer to drain the oil, then transfer them to a paper-towel-lined plate or baking sheet.
Season immediately with kosher salt and let them cool.
Store and Use:
The shallots can be stored in an airtight container at room temperature for up to 5 days.
Reserve the frying oil, which will now have a wonderful cooked onion flavor. Once cooled, it makes an excellent condiment for salads, stir-fries, and more.

Tips:
Use a fine mesh strainer to remove the shallots from the oil to minimize mess.
Stirring the shallots often while frying helps to keep the rings separate and ensures even cooking.
By following these steps, you’ll have delicious, crispy fried shallots that add a flavorful crunch to any dish. Enjoy!
What’s New in My Version
After making this dish a few times, here’s what has worked best for my family:
New Mexico chiles instead of jalapeño – I used 2 dried chiles, cleaned and soaked before blending. The result was flavorful with no heat at all—perfect for kids. If you like more kick, go with 4 chiles and maybe add a morita for a hint of smokiness.
Shrimp stock – Made from the shells and heads of the shrimp. It gave the broth amazing depth. Veggie stock works beautifully too. Chicken stock is fine, but it’s my last choice for a shrimp dish.
Noodles – I tried “fresh” frozen udon from a Japanese market. They’re ready in just 30 seconds in hot broth and were such a fun texture here. Don’t stress if you can’t find them—regular udon noodles, egg noodles, rice noodles, or ramen work perfectly.
A weekend dish (but worth it) – Between cleaning shrimp and making the paste, this takes a little longer than a standard weeknight dinner. That said, cravings win sometimes—I actually made this on a school night! The trick? Make a double batch of paste. I used about ½ cup today and froze the rest for another night of Khao Soi.

Khao Soi w/ Kauai Shrimp: A Light and Flavorful Summer Dish
A vibrant coconut curry noodle soup made with shrimp, turmeric, ginger, and garlic for warmth and nourishment. Silky coconut milk softens the spices, creating a mellow, absolutely delicious broth the whole family will love.
Ingredients
- 2 dried New Mexico chiles, stemmed, seeded, and soaked in hot water until soft
- 3 medium shallots, halved
- 8 garlic cloves
- 4-inch piece ginger, peeled and grated or chopped
- 3-inch piece turmeric, peeled and grated or chopped (or 1 Tbsp ground)
- ¼ cup chopped cilantro stems
- 2 Tbsp ground coriander
- 1 tsp curry powder
- (For more heat: use 4 New Mexico chiles, and optionally 1 morita chile.)
- 2 lbs raw Kauai shrimp with heads attached (or the best local shrimp you can find; organic chicken works too)
- 1 Tbsp olive oil or coconut oil
- 2 (14-oz) cans coconut milk
- 2 cups shrimp stock (or vegetable/chicken stock)
- 1 Tbsp tamari or soy sauce
- 1 Tbsp brown sugar
- Kosher salt and pepper, to taste
- 12–16 oz noodles of choice (fresh-frozen udon, egg, or rice noodles)
- Sliced red onion
- Pea shoots, bean sprouts, or microgreens (optional)
- Cilantro sprigs
- Crispy fried shallots or onions (optional)
- Lemon or lime wedges (essential! - in my opinion)
Instructions
- Make the Paste: Clean and soak the dried chiles in hot water for 15–20 minutes until softened. Drain. Blend chiles with shallots, garlic, ginger, turmeric, cilantro stems, coriander, and curry powder, adding a splash of water and a little oil until smooth.
- Clean the Shrimp: Rinse shrimp well. Twist off heads and peel shells, reserving them if making stock. Devein with a small knife, then rinse again. Keep shrimp chilled until ready to cook. Note: Make a quick shrimp stock by simmering the shells with celery, leek, lemon, garlic, herbs, and peppercorns for 20 minutes; strain before using.
- Make the Soup: Heat oil in a heavy pot over medium heat. Add the paste and cook 4–6 minutes, stirring, until fragrant and slightly darkened. Add coconut milk and stock. Bring to a boil, then reduce to a simmer for 20 minutes. Season with tamari, palm sugar, salt, and pepper.
- Finish & Serve: Add shrimp and cook until just pink and opaque, about 5 minutes. Add noodles to the pot (if using fresh-frozen udon, just 30 seconds!). Divide into bowls and garnish with toppings. Don’t skip a good squeeze of lime.
- Optional Toppings: Top with pea shoots, fresh cilantro, fried shallots, sliced lemon, and sliced red onion. Squeeze at least 1/2 a lemon or lime over each bowl for added flavor.
Notes
- Save shrimp shells and heads for stock—they add so much flavor.
- Paste freezes beautifully. I always make a double batch, use about ½ cup, and freeze the rest for next time.
- If using chicken: add raw chicken breasts after the broth comes to a boil, simmer until tender (20–25 min), then shred.
Nutrition Facts
Calories
625Fat
18 gSat. Fat
15 gCarbs
89 gFiber
5 gNet carbs
65 gSugar
8 gProtein
35 gSodium
452 mgCholesterol
205 mgThe nutritional information provided is an estimate. Please note that the actual nutritional content may vary depending on the exact ingredients and quantities used.